
1Overview
EQ Pro is a transparent, surgical equalizer with up to 24 freely typed bands over an interactive curve, a real-time spectrum analyzer, per-band dynamics, Mid/Side and Left/Right processing, and selectable phase behaviour. No analog colouring: it does exactly what the curve shows.
The drawn curve and the processed audio share the exact same filter maths, so what you see is what you hear. Every band is an individually host-automatable parameter, so a full automation lane is available for each.
2Installation
EQ Pro installs as three formats on macOS:
- VST3 →
~/Library/Audio/Plug-Ins/VST3 - Audio Unit (AU) →
~/Library/Audio/Plug-Ins/Components - Standalone application
After installing, rescan plug-ins or restart your host so it picks up the new version. If an instance is already loaded, remove and re-insert it (or reopen the project).
3The interface
The window has four areas:
Header
Plug-in name on the left, the Jeesonic logo on the right.
Margins
Stereo input meters and the Input knob on the left; stereo output meters and the Output knob on the right.
Curve & analyzer
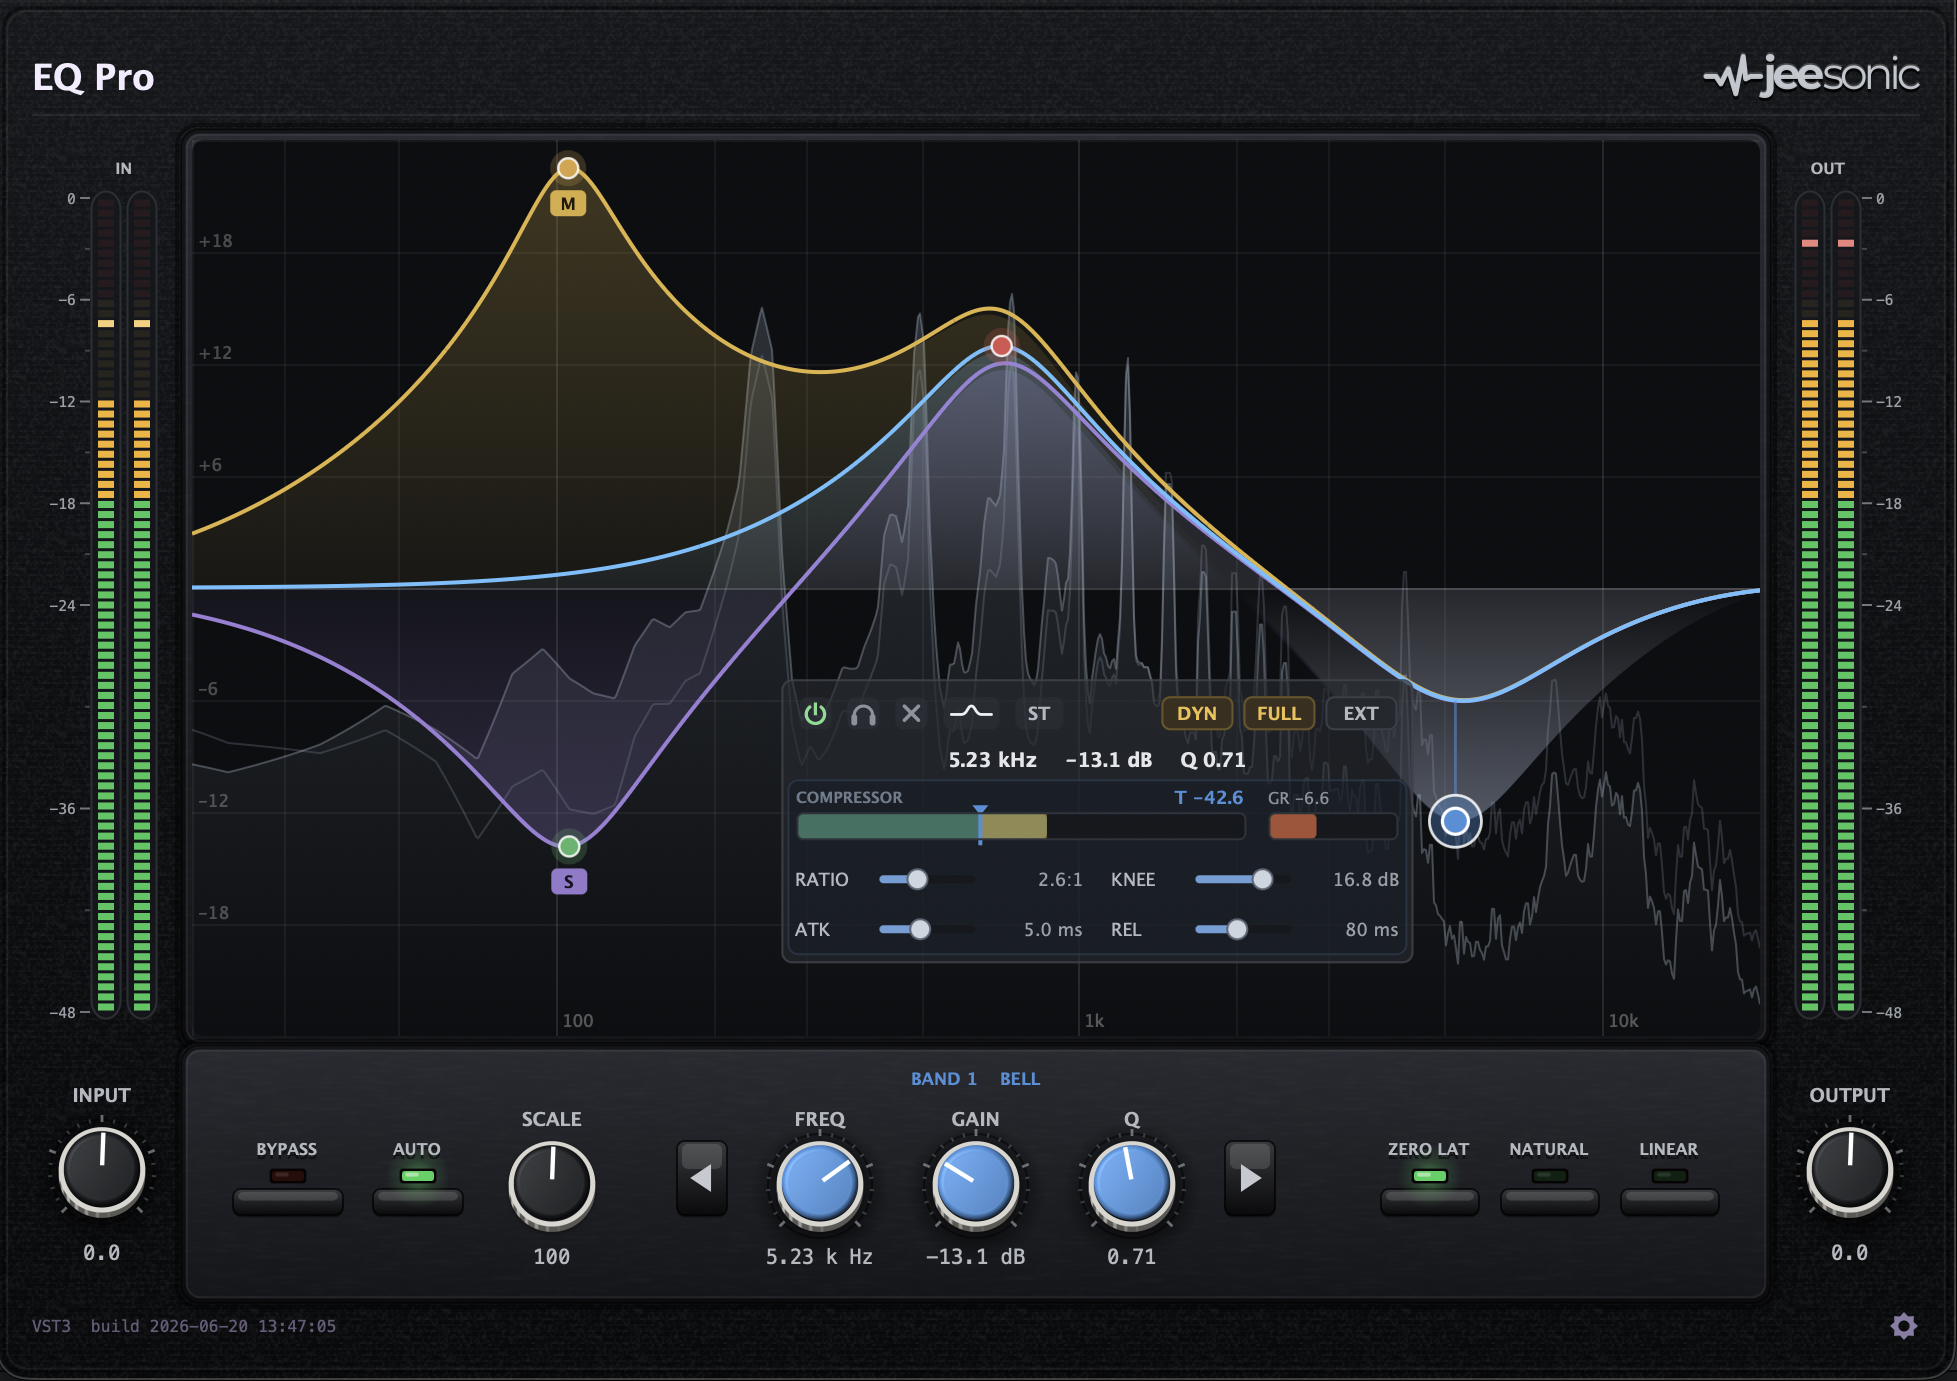
The central canvas: the grid, the live spectrum, the summed response, and one coloured handle per band.
Control strip
The bottom row: Bypass, Auto Gain, Gain Scale, the selected band’s Freq / Gain / Q, the phase modes, and the settings gear.
4Working with bands and the curve
The canvas maps frequency across its width (log scale, roughly 20 Hz to 20 kHz) and gain over its height (up to ±24 dB shown). Each band is a coloured dot sitting on the response curve.
Creating, selecting and removing bands
- Add a band: double-click an empty spot on the curve. A band dropped near the far left or right edge defaults to a low cut or high cut. New gain bands start at 0 dB, so the handle lands on the existing curve, then you drag it to shape it.
- Select a band: click its handle. The bottom Freq / Gain / Q knobs and the inline panel follow the selection. The ◀ / ▶ steppers next to the knobs walk through the bands in frequency order.
- Delete a band: double-click its handle, or use the
×button in the inline panel, or right-click the handle and choose Delete.
Shaping with the mouse
- Drag a handle to set frequency (horizontal) and gain (vertical) at once.
- Scroll over a handle to set Q (bells, shelves, notch) or the slope (cut bands, 6 to 96 dB/oct).
- Right-click a handle for a menu of type, slope and delete. Right-click empty space for an add menu.
5Filter types
Right-click a handle (or use the shape button in the inline panel) to pick the band type:
| Type | Use | Controls |
|---|---|---|
| Bell | Boost or cut around a centre frequency. | Freq, Gain, Q |
| Low Shelf | Lift or drop everything below a corner. | Freq, Gain, Q |
| High Shelf | Lift or drop everything above a corner. | Freq, Gain, Q |
| Low Cut | High-pass: remove lows below the corner. | Freq, Slope |
| High Cut | Low-pass: remove highs above the corner. | Freq, Slope |
| Notch | Deep, narrow removal at one frequency. | Freq, Q |
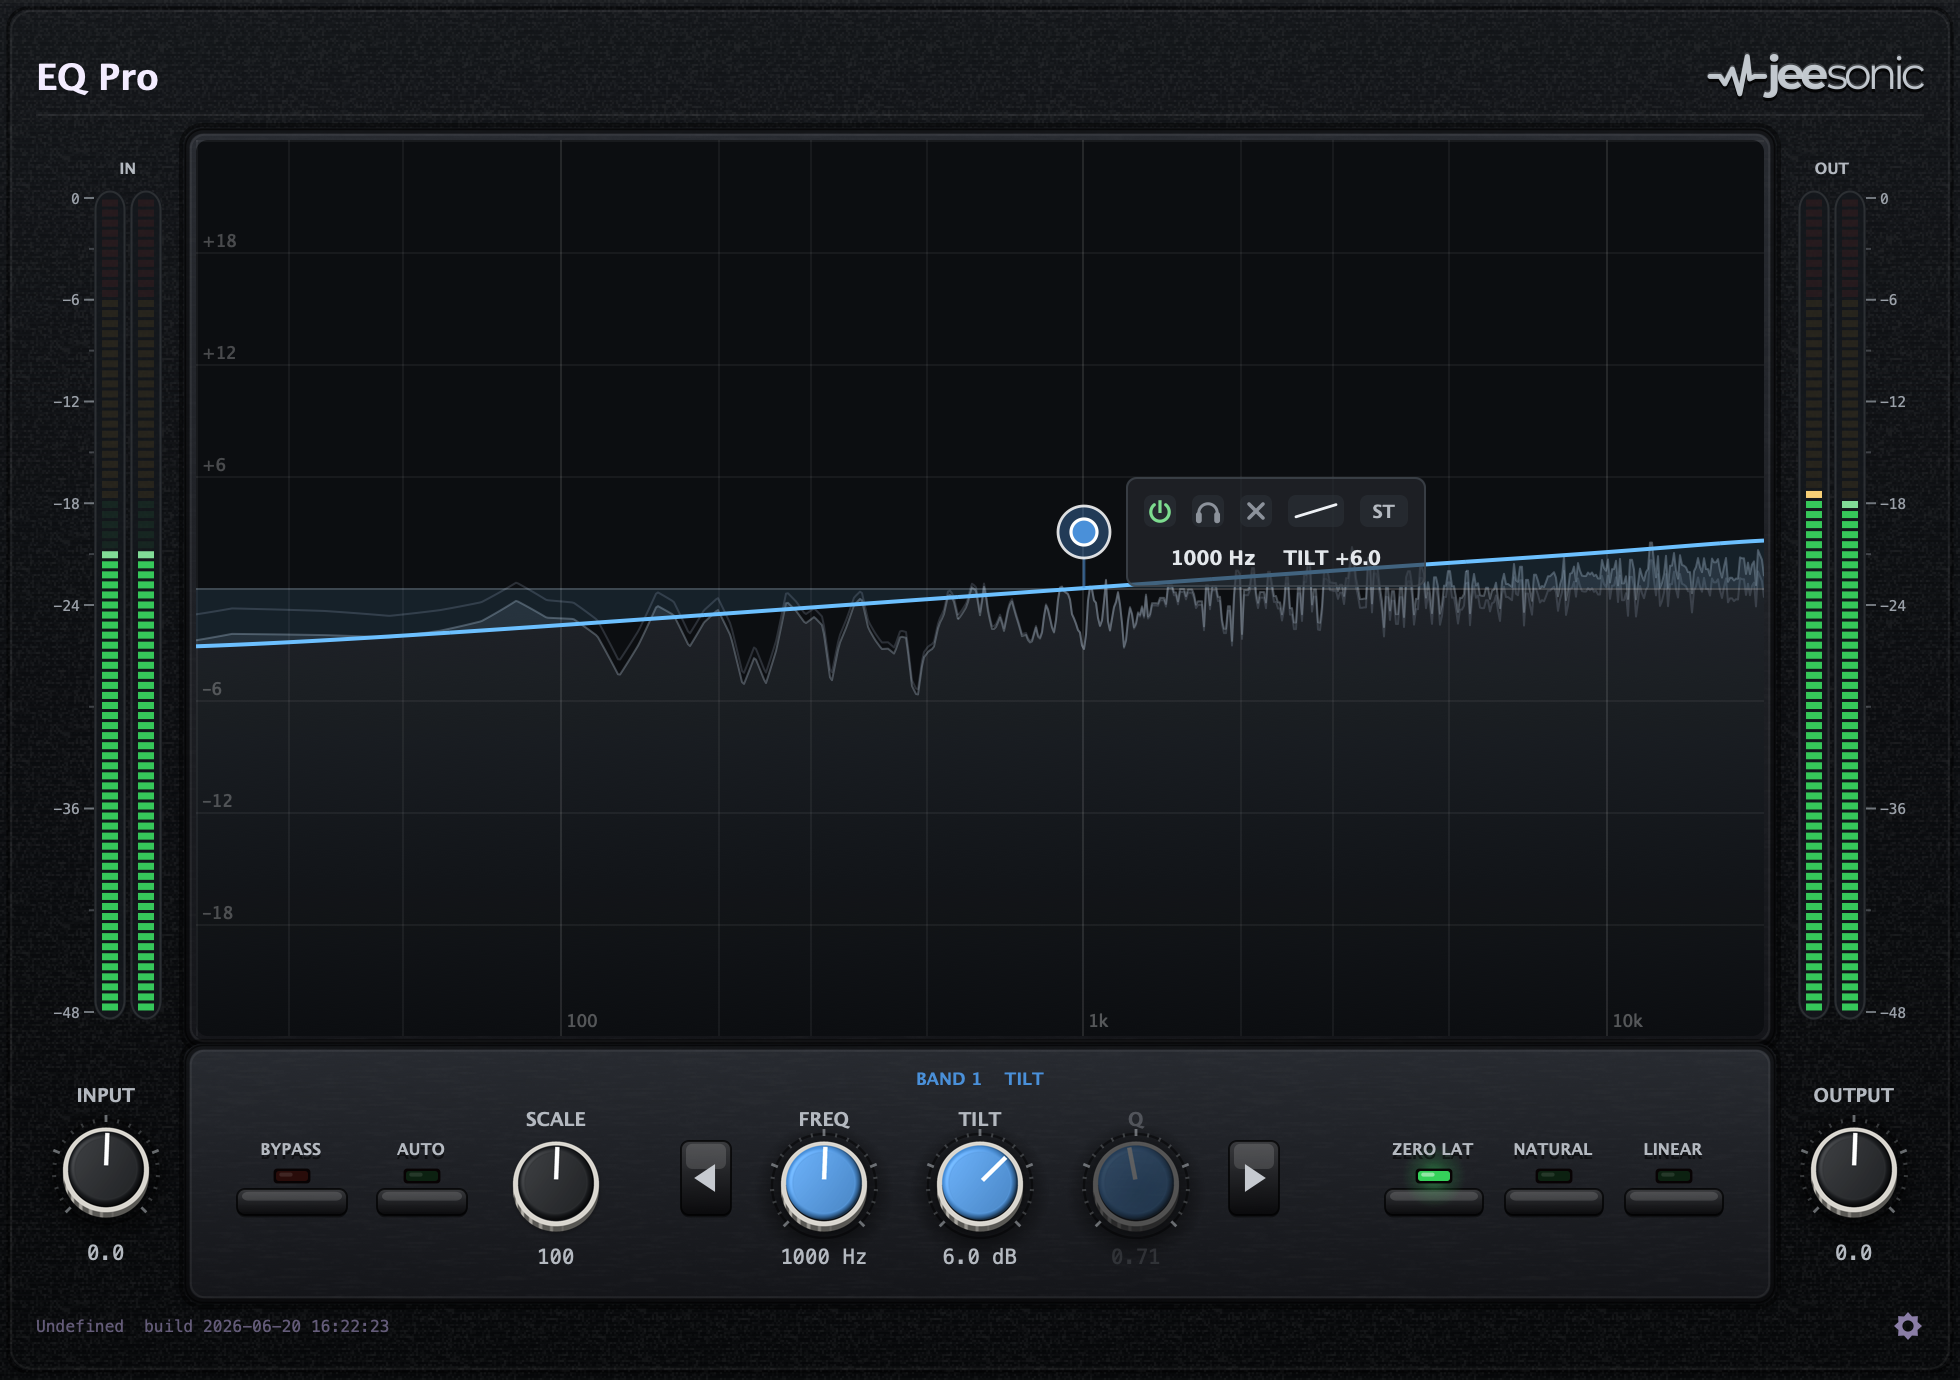
| Tilt | Tilt the whole spectrum darker or brighter around a pivot. | Freq (pivot), Tilt amount |
Bells and both shelves are symmetric (constant-Q): a cut is the exact mirror of the boost of the same Q. Cut types are only offered when no other band sits further out on that side, so a cut never swallows bands beyond it.
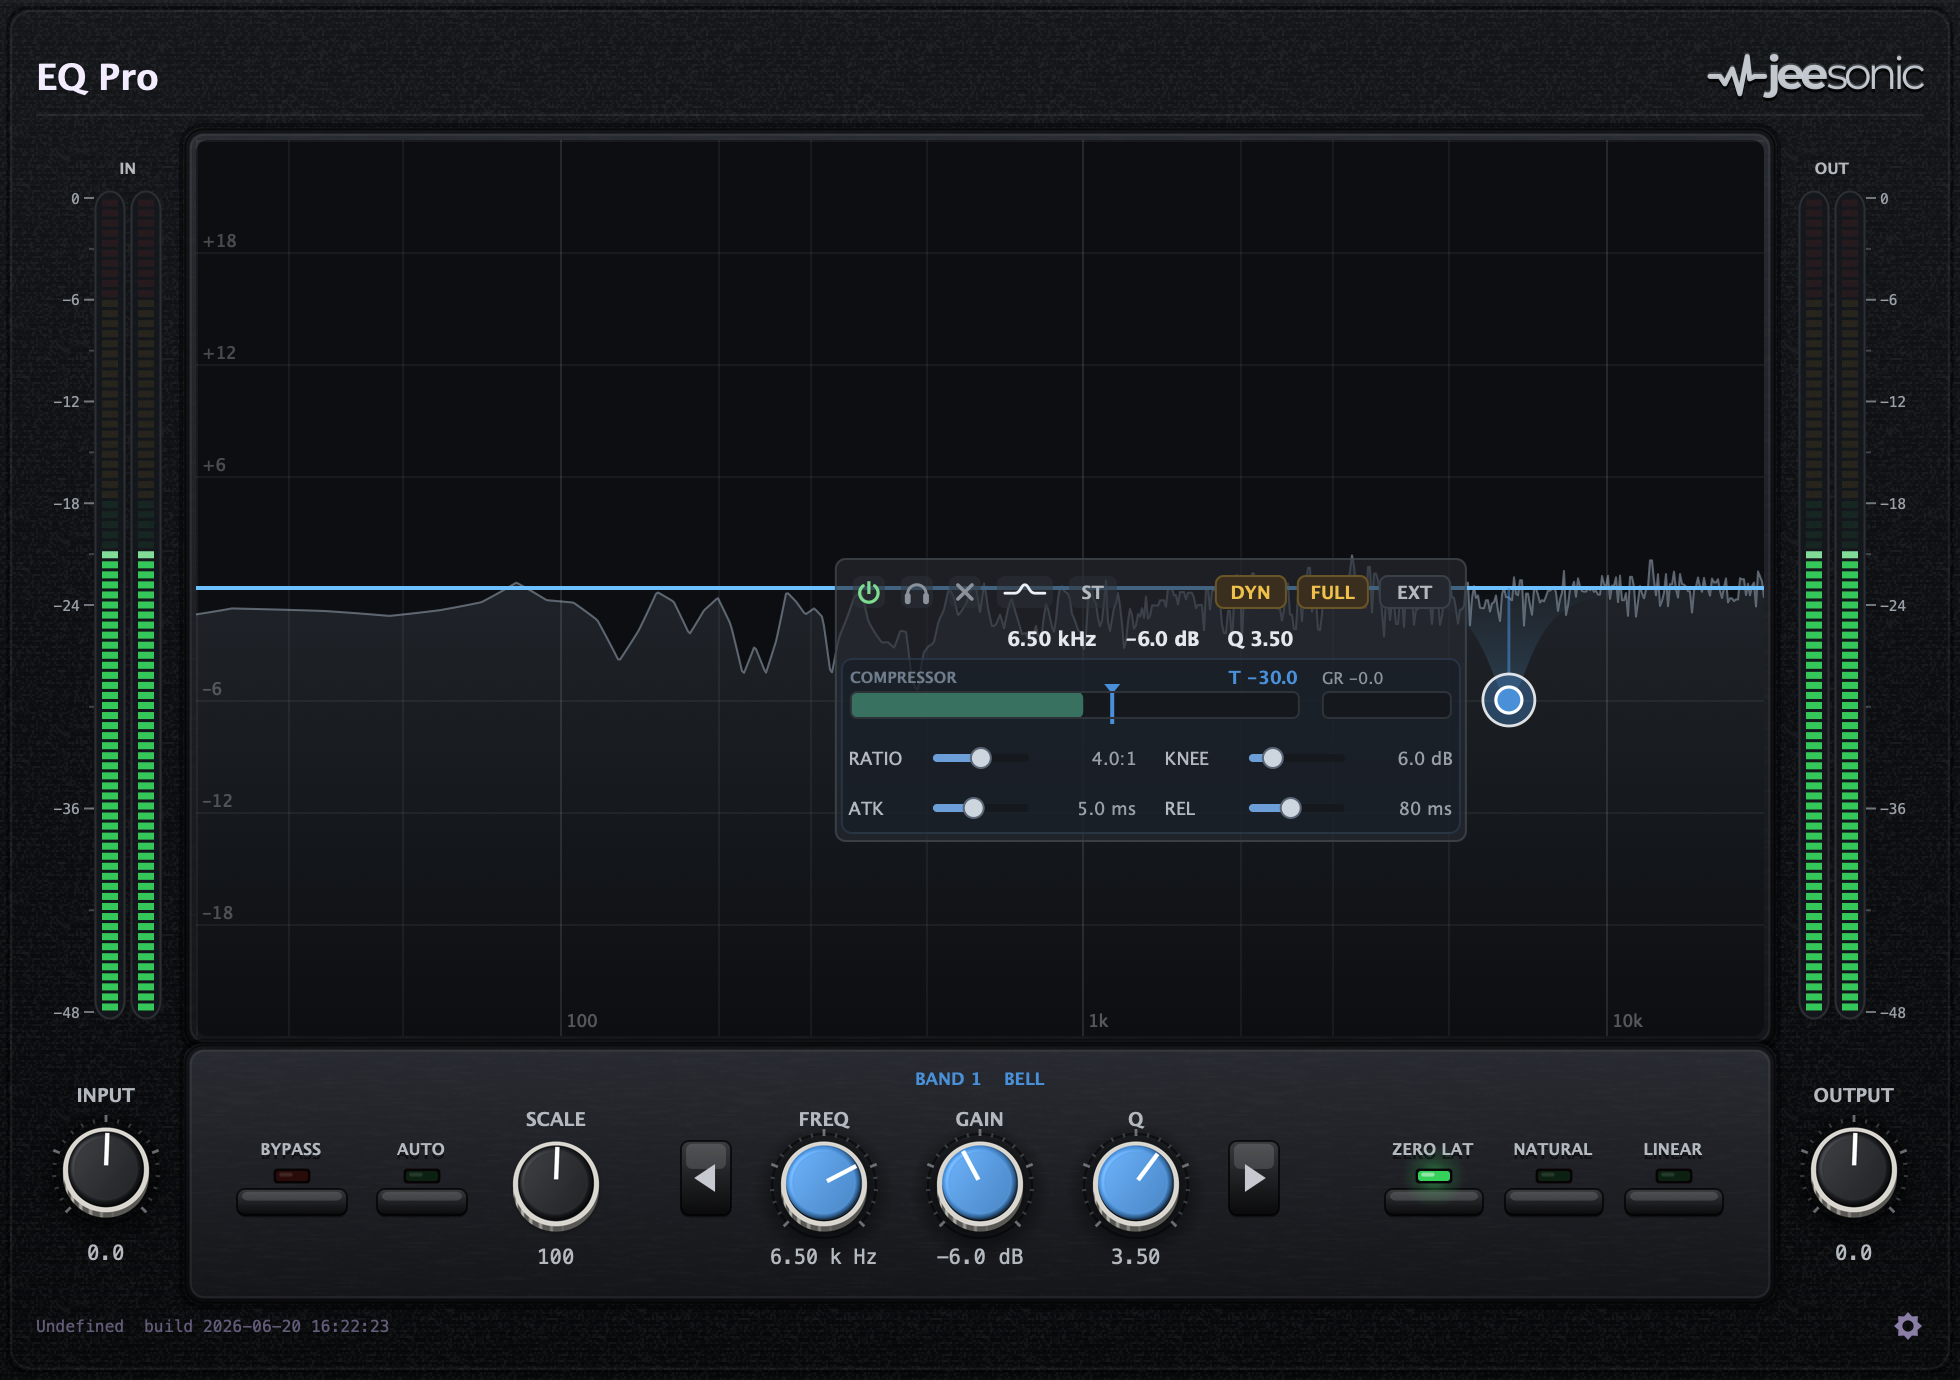
6The inline band panel
Selecting a band shows a panel floating at its handle. Everything for that band lives here, so the bottom strip never reflows.
Top row
- Power (⏻): switch the band on or off without deleting it.
- Solo (headphone): audition just this band as a band-pass, to find the exact spot. It is a listen tool, not a mute, so it does not change the mix. On a dynamic band the dynamics stay active in solo, so you hear exactly what the band is doing.
- Delete (×): remove the band.
- Shape button: open the filter-type popup.
- Channel button (
ST): set the stereo placement (see Mid/Side). - DYN FULL EXT: the dynamics toggles (see Dynamic EQ).
Editable readout
The Hz / dB / Q (or slope / tilt) values are live fields: drag a value vertically to nudge it
(hold Shift for fine), or double-click to type a number. Enter k for kHz. The
four compressor values (Ratio / Knee / Attack / Release) are editable the same way, on top of dragging their
sliders; for Ratio you can type Inf for brickwall limiting.
7Dynamic EQ
Any bell or shelf can be made dynamic: its gain engages only when the signal inside that exact band crosses a threshold. The detector listens to precisely the band you drew, at its own frequency and Q, so it reacts only to what that band covers, nothing else.
Gain is the range, threshold is the trigger
The band’s Gain sets the range: it is the limit the dynamic move reaches when the band is fully engaged. A small gain is a gentle move, a large one is firmer. The Threshold is separate and absolute (in dBFS): the band starts to act as the in-band level rises above it and reaches the full Gain as the level climbs further. Because the two are decoupled, you set how hard the band can pull with Gain and where it starts pulling with Threshold, independently.
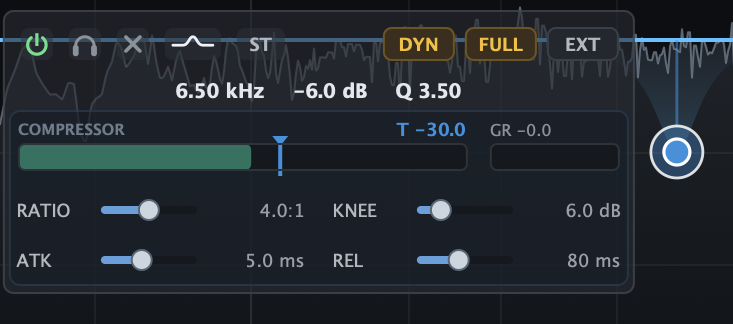
The dynamics meter
Whenever a band is dynamic, the panel shows a per-band dynamics meter, the standard view:
- The level bar is the in-band detector level. The part that sits above the threshold (what actually drives the move) is drawn in amber.
- The threshold marker (a small triangle in the band’s colour) sits on the level track. Drag
it to set the threshold; the
Treadout shows its dBFS value. - GR shows the live move the band is applying right now:
GR(coral) for a cut band andGA(green) for a boost band, so the meter fills whichever way the band works.
Toggles
- DYN turns the dynamics on for the band.
- FULL reveals the full compressor controls below the meter, as four sliders in two rows: Ratio and Knee, then Attack and Release. With FULL off, the band uses automatic, program-adaptive ballistics and the default shaping, which is a good starting point. FULL only exposes more control, it does not change the detector or the threshold.
- EXT drives the detector from the external sidechain bus instead of the band’s own signal. An amber dot warns if EXT is on but no sidechain signal is arriving (the band then falls back to internal detection).
The full compressor (FULL)
With FULL on, the band is a complete compressor on its own frequency region. Together with the Threshold (on the meter) and the Gain (the range), the controls are:
- Ratio sets how much of the level over the threshold is removed, from
1:1(nothing) up toInf(brickwall).Infis the default, where the band holds its region at the threshold; a softer ratio yields a gentler, more compressor-like move. The Gain still caps the maximum move. - Knee is the soft-knee width (0 to 24 dB) around the threshold, so the onset can be a gradual ease-in (wider) or a hard switch (0 dB). The default is 6 dB.
- Attack and Release set how fast the band reacts and recovers.
8Mid/Side and Left/Right
Each band can act on a chosen part of the stereo field. Click the channel button in the panel and pick:
| Mode | Acts on | Handle badge |
|---|---|---|
| Stereo | Both channels equally (the default). | none |
| Mid | The mono (centre) sum only. | amber |
| Side | The stereo difference only. | violet |
| Left | The left channel only. | coral |
| Right | The right channel only. | teal |
When non-stereo bands are present, the curve splits into colour-coded component lanes (Mid and Side, or Left and Right) so you can see each placement’s own response. A band’s handle rides its own lane.
9Spectrum analyzer
A time-smoothed FFT analyzer sits behind the curve, on a log-frequency display with an interpolated low end (no staircase). It has three modes, set from the settings gear:
- Off: no analyzer.
- Post: the processed (output) spectrum, filled.
- Pre + Post: the input spectrum as a faint line behind the filled output, so you can see what the EQ did.
Use it to find problem frequencies, but trust your ears for the final move.
10Phase modes and oversampling
Three phase modes sit as caps in the bottom strip; the active one lights green.
| Mode | Character | Latency |
|---|---|---|
| Zero Latency | Classic minimum-phase IIR. Lowest CPU, no delay. | None |
| Natural Phase | Analog-matched magnitude, minimum-phase. Smooth and musical. | None |
| Linear Phase | No phase shift at all, via an FFT. Best for mastering and parallel paths. | Adds latency |
Oversampling (Off / 2x / 4x, in the settings gear) runs the filters at a higher internal rate for cleaner behaviour near Nyquist on steep or high-frequency moves. It applies to the IIR paths (Zero Latency and Natural Phase) and uses a low-latency design.
11Gain Scale and Auto Gain

Gain Scale
The Scale dial (0 to 200 %) scales every band’s gain at once: 100 % is as drawn, 50 % is half the moves, 0 % is flat, 200 % is double. The whole curve, the handles and the on-curve readouts follow the Scale, while the stored per-band values stay untouched. Use it to dial the whole EQ in or out, or to A/B a gentler version of your curve. Cut and notch bands have no gain, so they are unaffected.
Auto Gain
The Auto cap level-matches the output so bypassing the EQ compares at an even loudness. It is deterministic: the trim is computed purely from the filter response (the average level the curve adds or removes), never from a level measurement. That means it has no detector of its own and never acts like a compressor, which is exactly what you want from an EQ. A broadband boost gives a downward trim, a broadband cut gives an upward trim, and a balanced curve leaves the level essentially unchanged.
Auto Gain follows the dynamics
Auto Gain also folds in what the dynamic bands are doing right now. It reads each dynamic band’s live gain (which the band’s own dynamics already determine) and keeps the broadband loudness steady as the band moves. The result is a dynamic EQ that changes the spectrum without changing the level: the notch or peak still acts, but the track does not get quieter or louder as it does.
This is still not a second compressor: the only thing that moves over time is the band’s own dynamic gain, and the compensation is feed-forward (the detector listens before it), so it cannot pump or run away. It holds the perceived (equal-energy-per-octave) loudness, so it tracks real program material closely.
12Input, output and metering

- Input knob (left margin): gain applied before the EQ. The input meters follow it.
- Output knob (right margin): trim applied after the EQ.
- Stereo meters flank the curve: a pair on the left for input, a pair on the right for output. The outer bar of each pair carries the dB scale.
- Bypass (bottom left): passes the signal through untouched for a true A/B.
For an honest bypass comparison, turn on Auto Gain so the levels match.
13Settings
The gear icon at the bottom right opens the settings menu:
- UI Scale: 75 / 85 / 100 / 125 / 150 / 175 / 200 %, so the window fits your screen.
- Analyzer: Off / Post / Pre + Post.
- Oversampling: Off / 2x / 4x.
All plug-in state (every band and setting) is saved with your host session.
14Mouse & keyboard reference
| Action | Result |
|---|---|
| Double-click empty curve | Add a band (a cut at the far edges, at 0 dB elsewhere) |
| Double-click a handle | Delete that band |
| Click a handle | Select the band |
| Drag a handle | Set frequency and gain |
| Scroll over a handle | Set Q (bell / shelf / notch) or slope (cuts) |
| Right-click a handle | Type / slope / delete menu |
| Right-click empty curve | Add-band menu |
| Drag a value in the panel | Nudge it (Shift = fine) |
| Double-click a value | Type a number (k for kHz) |
| ◀ / ▶ steppers | Select the previous / next band by frequency |
15Tips
- Find then fix: solo a bell and sweep to locate a resonance, then back the gain off to cut it.
- Tame dynamically: for a frequency that is only a problem on loud notes (a harsh vocal S, a boomy kick), use a dynamic cut instead of a static one so it only acts when needed.
- De-ess in stereo or Side: a dynamic high-shelf or bell on the Side channel can tame sibilance or harsh cymbals without dulling the centre.
- Shape, don’t squash: with FULL revealed, dial a softer Ratio and a wider Knee for a gentle, musical move instead of hard limiting; the Gain still caps how far it can go.
- Tone without loudness: keep Auto Gain on with your dynamic bands and the EQ changes the spectrum while holding the loudness steady, so you hear the tone change, not a level change.
- Match loudness: turn on Auto Gain before A/B-ing against bypass, so you judge tone and not level.
- Linear phase for masters: switch to Linear Phase on a mix bus or master where phase smear matters; use Zero Latency while tracking to avoid delay.
- Scale to taste: build an aggressive curve, then pull Scale back to 60 to 80 % for a more natural version without redrawing every band.